
Abrir ou trocar o mapa
Ao iniciar, o slot ativo fica visível.
- Para escolher outro mapa
- mantenha o ícone do mapa pressionado
- abra Mapas no navegador
- depois Slots de mapa e ative a fonte desejada.
Começar
Uma rápida introdução à tela padrão, ferramentas, camadas, mapas, objetos, pesquisa e recursos ao vivo.
Caminhos diretos
Estes caminhos usam os nomes da interface atual. O conteúdo só é adicionado após revisar e confirmar a prévia.
Ao iniciar, o slot ativo fica visível.
Perfil da aplicação
Ambos os perfis contêm as mesmas funções do MapTools. Compare a apresentação dos controlos neste dispositivo e escolha uma disposição inicial.


O menu completo de ferramentas está sempre diretamente disponível. Adequado se utilizar regularmente muitas funções diferentes do MapTools.
Ferramentas, Navegação, Em direto e Dados permitem aceder diretamente a todas as funções do MapTools. Abra uma secção para ver as suas ações.
Utilize as Definições para gerir predefinições de mapa, repetir esta introdução, abrir a visão geral das funções e mudar o perfil da aplicação. Um perfil altera apenas a disposição dos controlos.
Trajeto, Rota, Marcador e a telemetria têm maior destaque. Foto, Nota e Áudio estão rapidamente disponíveis no submenu Marcador; todas as outras ferramentas continuam acessíveis em Mais opções.
A barra de telemetria mostra os valores relevantes para a atividade atual e abre os detalhes ao tocar. Mais opções contém o menu completo de ferramentas. As predefinições de mapa e a mudança de perfil continuam nas Definições.
Trajeto abre os controlos de registo. Para iniciar ou terminar, mantenha a ação premida até o indicador de progresso ficar completo e confirme em seguida.
Rota abre a criação, edição e seleção de rotas. Para terminar a orientação ativa, é necessário manter a ação premida de forma deliberada e confirmar, tal como no registo de trajetos.
Abra Marcador para escolher uma posição. À direita das opções de posição, o mesmo submenu contém Foto, Nota e Áudio. Estas ações criam um marcador georreferenciado sem ocupar permanentemente espaço no ecrã principal.
A pesquisa, a troca de mapas, o explorador de objetos, as definições, o GPS/InfoTap e a ocultação dos controlos do mapa estão disponíveis em ambos os perfis.
Interface
O ecrã padrão usa o mapa como área de trabalho. As marcas numeradas ficam junto dos controlos visíveis; a legenda explica as áreas. Só os links de detalhes abrem páginas adicionais do manual.
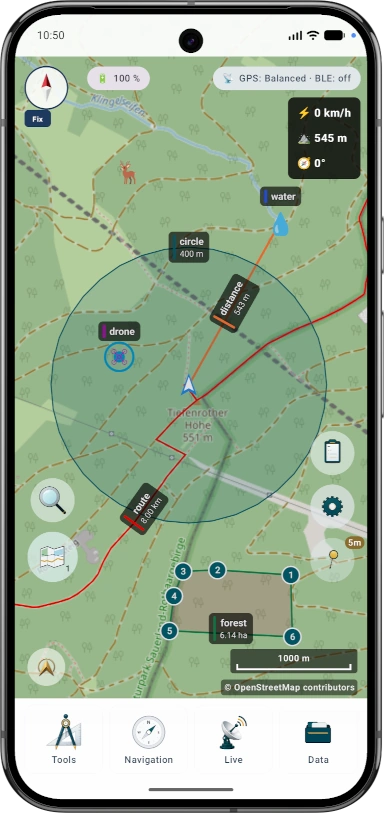
Áreas da tela
Os principais controles estão disponíveis diretamente na visualização do mapa.
A barra de ferramentas inicia ações de mapa diretamente na área de trabalho.
Altera a disposição dos controlos, sem alterar mapas, camadas, projetos ou dados registados.
Controle quais mapas e camadas de dados estão visíveis.
O navegador de mapas gerencia fontes de mapas e dados locais no dispositivo.
O navegador de objetos mostra o conteúdo do projeto atual.
A pesquisa combina introdução de coordenadas e pesquisa de POI. Os objetos do projeto estão no navegador de objetos.
O menu Live mostra funções em execução e ações rápidas.
Primeiros passos
Os passos mais importantes para o primeiro uso.
Dados offline
Para trabalhar sem rede móvel, descarregue previamente mapas, POI, modelos de elevação ou overlays de um fornecedor adequado e importe-os no ArxSilex MapTools.
Navegação → Gravação contém o modo e os controlos para iniciar, pausar, retomar e terminar um percurso. Ao terminar, edite o nome sugerido e guarde ou termine sem guardar. Descartar requer confirmação. As permissões são pedidas ao iniciar.
Guardar e terminar · Terminar sem guardar · Continuar a gravar
A gravação será descartada. Os marcadores, fotografias e notas de áudio existentes serão mantidos.
A mini barra mostra o modo GPS. Toque para expandir; mantenha premido para abrir os detalhes. Estado e telemetria ficam na margem direita do mapa.
O perfil Padrão coloca o cartão compacto de gravação em cima, entre bússola e estado. Caminhada mostra os dados acima do menu inferior. Toque para abrir detalhes com câmara e microfone. O X permanece acessível acima do conteúdo deslocável.
Os detalhes do percurso mostram a rota e a gravação separadamente, com velocidade média, ritmo e estatísticas de movimento claramente identificadas como estimativas. Os valores em falta continuam desconhecidos. As ações de fotografia e áudio estão no painel aberto dos detalhes. A média e o ritmo na barra do mapa usam a duração completa da gravação, incluindo pausas e falhas de GPS. Os valores em movimento são estimativas dos trechos GPS gravados. Posições em falta não são pausas confirmadas. O máximo é suavizado; valores indisponíveis mostram um traço. O ritmo é o tempo por quilómetro ou milha.
Breve introdução
Obrigado por utilizar o MapTools. Nas próximas páginas, vou apresentar as partes mais importantes da aplicação e mostrar como colocar um marcador e registar um trajeto.
Tocar: introduzir coordenadas. Manter premido: pesquisar POIs.
Tocar: mudar para a próxima posição de mapa configurada. Manter premido: abrir mapas e camadas.
Tocar: centrar o mapa na sua posição. Manter premido: ativar o InfoTap.
O pequeno campo de estado mostra o modo GPS atual. Toque para expandir ou recolher o estado completo em direto. Mantenha premido para consultar os detalhes do GPS. O campo expandido também inclui botões para os detalhes do GPS e da atividade.
Marcador está disponível no menu Ferramentas aberto. A posição pode vir do mapa ou de uma das fontes de posição disponíveis; escolha o nome, o símbolo e a cor antes de guardar.
Consoante a ferramenta, pode tocar no mapa, introduzir coordenadas, reutilizar a posição de um objeto, utilizar a sua posição GPS atual ou posicionar o ponto com a mira. A média de posições combina várias posições determinadas por GPS e é uma função Pro.
A bússola indica o norte em relação ao mapa rodado. Toque duas vezes para orientar o mapa para norte. Toque em Fixar para manter um azimute; mantenha premido para abrir a bússola para atividades ao ar livre.
Toque num objeto do mapa (marcador, rota, área, ...) para abrir os seus detalhes. Mantenha-o premido para o editar. Se os objetos se sobrepuserem, o MapTools apresenta primeiro uma seleção.
Abre o explorador de objetos. Aí pode aceder aos objetos que criou no mapa.
Navegação → Registo contém o modo de registo e os controlos para iniciar, pausar, retomar e terminar o registo de um trajeto. Ao terminar, edite o nome sugerido e guarde ou escolha terminar sem guardar. Descartar exige confirmação. As permissões são pedidas ao iniciar o registo.
Aqui pode criar objetos no mapa e efetuar medições. · Aqui pode definir destinos, registar trajetos e trabalhar com rotas. · Aqui encontra funções para dados atuais e trabalho em grupo. · Aqui pode gerir projetos, conteúdos de mapas, importações, exportações e cópias de segurança.
Pode repetir a breve introdução a qualquer momento em Definições → Ajuda e informações.
 Compass & FixToque na bússola para alternar entre norte no topo e direção do movimento. Dois toques colocam o norte no topo; um toque longo abre a bússola de exterior. Fix mantém um azimute de forma independente. Mover ou rodar o mapa pausa o seguimento; o botão de centrar retoma-o.
 Posição atualMarca a tua posição GPS atual e direção no mapa.
 PesquisarA pesquisa combina introdução de coordenadas e pesquisa de POI. Os objetos do projeto estão no navegador de objetos.
  LayersGere slots de mapa, mapa ativo, camadas e sobreposições.
  Navegador de objetosAqui encontras marcadores, waypoints, tracks, rotas, áreas, círculos, distâncias, rumos, áreas visíveis e grelhas de busca. Podes pesquisar, filtrar, mostrar ou ocultar, criar coleções, abrir detalhes, editar, copiar, mover, exportar ou eliminar objetos.
 DefiniçõesPerfil da aplicação: Altera a disposição dos controlos, sem alterar mapas, camadas, projetos ou dados registados. Predefinições de mapas: Uma predefinição de mapa guarda as quatro posições de mapa, a sua ordem e a posição ativa, incluindo fontes, estilos, camadas, terreno, sobreposições, preferências de cálculo de rotas e visibilidade dos objetos do mapa. O perfil de interface, coordenadas, cores, ícones favoritos e ordem dos menus permanecem definições globais.


 Ferramentas
 Navegar
 Ao vivo
 Dados
Dados
Redes sociais
Seguir ArxSilex
Notícias, capturas, vídeos e atualizações curtas sobre ArxSilex MapTools também estão disponíveis nestes canais externos.
Estes links abrem plataformas externas. Os respetivos operadores são responsáveis pelos seus conteúdos e pelo tratamento de dados. Privacidade · Aviso legal